
How to Connect a Domain to a Brilliant Directories Website
Link: https://support.brilliantdirectories.com/support/solutions/articles/12000019271
Connect a custom domain, a subdomain, or a free directoryup.com address from Settings > Domain Manager. The connection flow checks the proposed address and shows the pointing instructions before changing the website address.
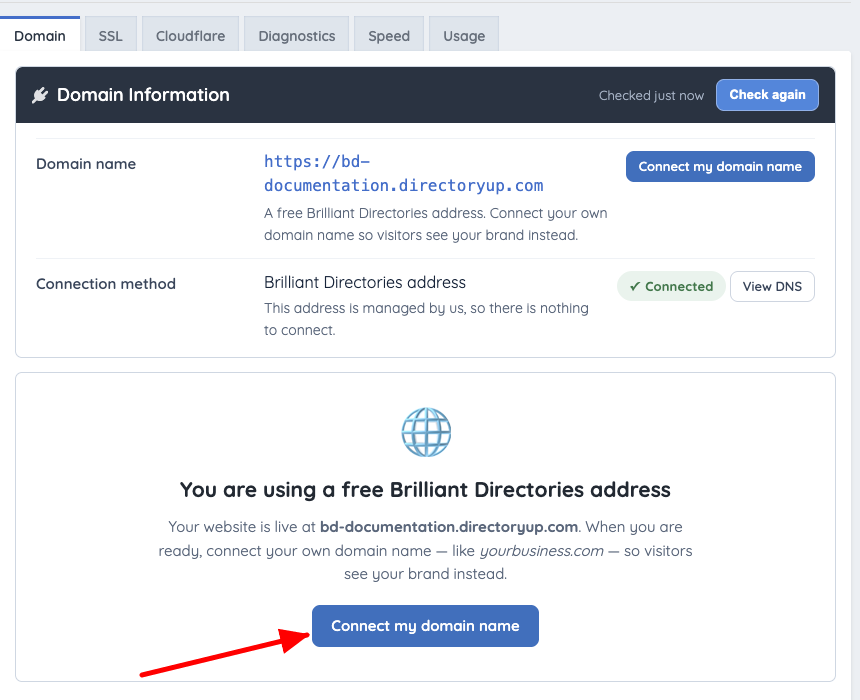
Example on a free directoryup.com address. Additional tabs appear when a custom domain and its services are available.
About the examples: The screenshots use Brilliant Directories test websites. demotailwind.com is managed in Cloudflare and illustrates the Cloudflare route; selfautomated.com uses Brilliant Directories nameservers and illustrates the non-Cloudflare alternative. These are alternative DNS arrangements, not consecutive changes to the same domain.
Before starting
- For a custom domain, have access to its DNS provider and registrar.
- Record the existing mail provider and preserve its MX, SPF, DKIM, DMARC, and other required records.
- For a Cloudflare connection, have permission to authorize the correct account and domain.
- For an existing live site, complete the domain-change checklist.
- Managed SSL installation requires the Managed SSL add-on to be active. A domain change alone does not add that entitlement.
The final switch changes the website address. The former address is no longer the site’s primary address, and an old-domain redirect must be arranged separately if needed.
The wizard has four stages, shown across the top: Choose An Address, Check It, Point Domain, and Switch Over. A completed stage can be clicked to return to it until the switch has run.
1. Choose An Address
- Open Settings > Domain Manager > Domain.
- Click Connect my domain name or Change my domain name.
- Select the appropriate option below.
- Use a domain from my Cloudflare account: when available, authorize Cloudflare and select a domain from the account. The screen marks this option Fastest — nothing to type.
- A domain name I own: enter a registered domain or a true subdomain and configure its DNS.
- A free address from us: choose the portion before .directoryup.com.
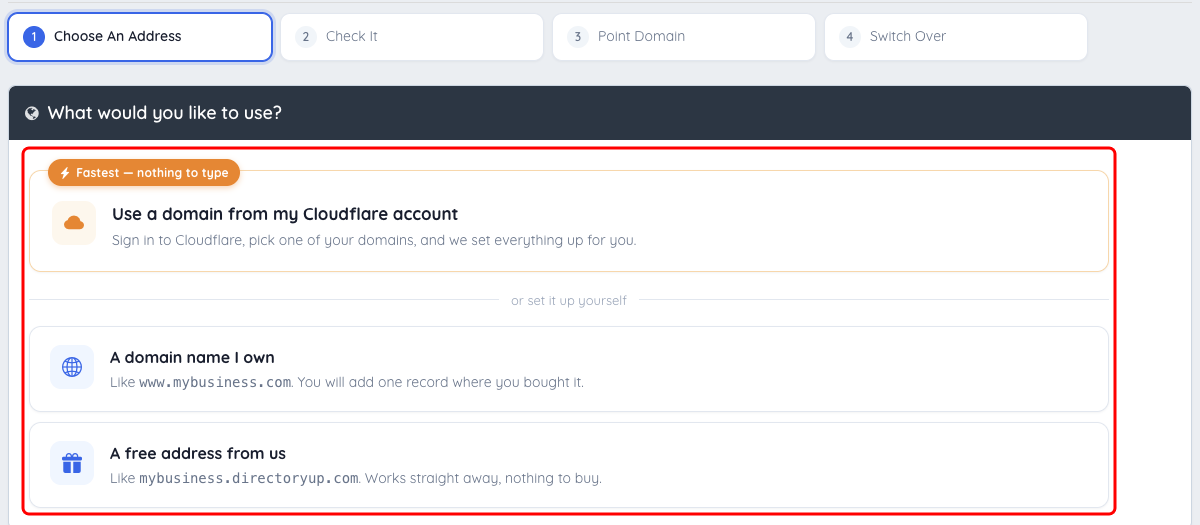
Choose the route that matches the domain and DNS provider.
2. Check It
- Enter the address without http://, https://, or a page path.
- A root domain can be typed with or without www., as example.com or www.example.com. The wizard always connects a root domain as www.example.com.
- A true subdomain is entered exactly, such as members.example.com. If www. is typed in front of a subdomain, the wizard removes it and checks the subdomain itself.
- For a root domain, choose how the address appears under How should your address appear?: With www. or Without www.. The choice appears as soon as a root domain is typed, and its default follows what was typed. Visitors who type the other version are sent to the chosen one. Without www. needs the root domain itself to point at the website; see Point the root domain.
- Click Check this address. The box turns green when the address can be checked. A domain extension that does not exist, such as .come, is refused with a message naming it.
- Resolve any validation message before continuing.
For a free address, enter only the chosen prefix using letters, numbers, and hyphens. For Cloudflare, select the intended domain from the account's domain list; use its filter to locate the correct domain.
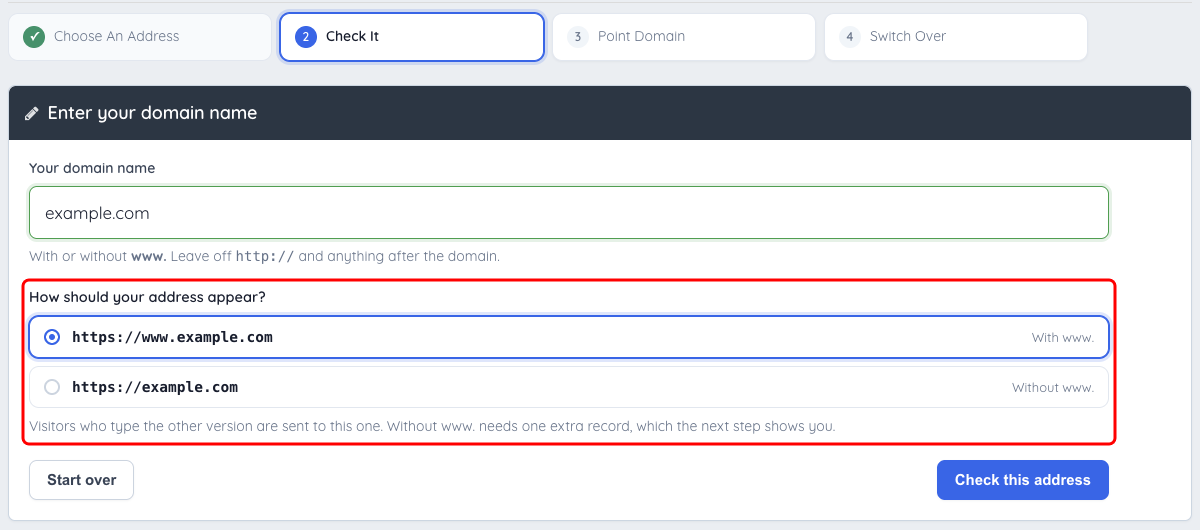
The A domain name I own route: a root domain is typed and the With www. / Without www. choice appears under the box. The Cloudflare route selects the domain from a list instead, as shown below.
3. Point Domain
The Point Domain stage reports where the address currently points, names the company where the records are added (the domain's DNS provider, or the registrar when no DNS provider is identified), and lists each record with its own Pointed or Not pointed yet status. Copy the site's own target from this screen; an example address from documentation is not a usable target. Instructions opens the step-by-step guide below the records, and Use a different address returns to Check It.
Add the records at the current DNS provider
- Open the DNS provider's record editor.
- Add or update the record for the exact host shown in the wizard.
- Save the DNS change at the provider.
- Return to Domain Manager.
- Click Check again.
The www record has these fields:
Type: CNAME
Name: www
Value: The site's unique directoryup.com target copied from Domain Manager
For a subdomain such as members.example.com, the only record is a CNAME whose name is normally members at the DNS provider, pointing to the same target. The root domain is not changed.
For a root domain, the stage lists a second entry for example.com itself: a record, or a forwarding setting on GoDaddy with With www.. With With www., that entry sends visitors who type example.com on to www.example.com; the website works at www.example.com without it, so Continue is offered once the www record is pointed. With Without www., example.com is the main address and must reach the website. The root domain cannot take an ordinary CNAME, so the right record depends on the DNS provider; see Point the root domain.
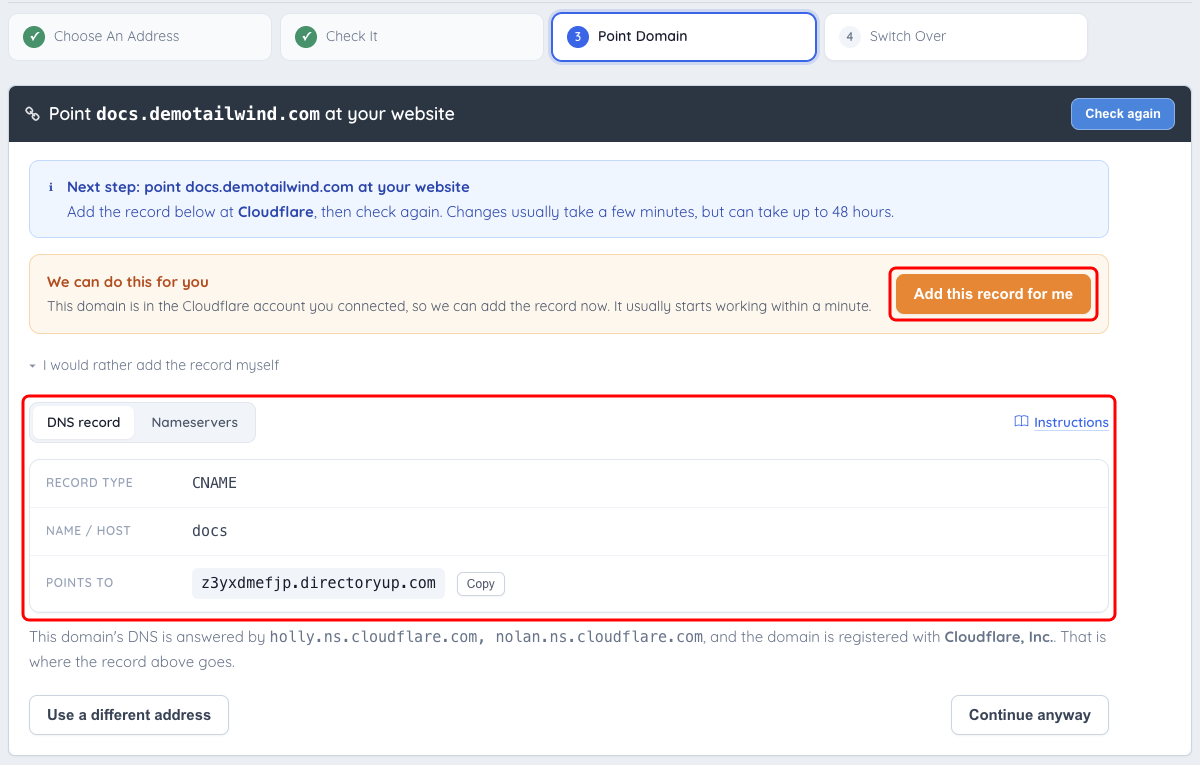
The Point Domain stage for a subdomain of a domain in the connected Cloudflare account. Use the target shown by the website being connected.
Point the root domain (CNAME exception)
DNS does not allow an ordinary CNAME record on the root of a domain (the record named @), so the root domain is connected differently depending on the company that runs the domain's DNS. The Point Domain stage identifies that company from the domain's nameservers and shows the matching method below: a CNAME on Cloudflare, Domain Forwarding on GoDaddy when the address uses www, an ALIAS record on Namecheap, and an A record for any other DNS provider or when the provider cannot be identified. An A record works everywhere, but it points at a fixed server address; the Cloudflare, GoDaddy, and Namecheap methods keep the domain following the website if it moves to a different server.
Brilliant Directories nameservers
Nothing needs to be added. The Point Domain stage reports We manage the DNS for the address, and the records are created during the switch.
Cloudflare
Cloudflare flattens a CNAME on the root, so the root takes the same record as www. Delete the existing root and www records first, then add both of these:
Type: CNAME
Name: @ (the root domain, example.com)
Value: The site's unique directoryup.com target
Type: CNAME
Name: www
Value: The site's unique directoryup.com target
When the Cloudflare account is connected to Domain Manager, Use a domain from my Cloudflare account or Add this record for me creates these records automatically.
GoDaddy
GoDaddy does not allow a CNAME record on the root of a domain. With With www., connect it in two steps:
- Edit the existing www record so it is a CNAME pointing to the site's unique directoryup.com target.
- Turn on Domain Forwarding so example.com forwards to https://www.example.com: in GoDaddy's DNS settings for the domain, open Forwarding, click Add Forwarding, choose https://, enter www.example.com, select Permanent (301), and click Save.
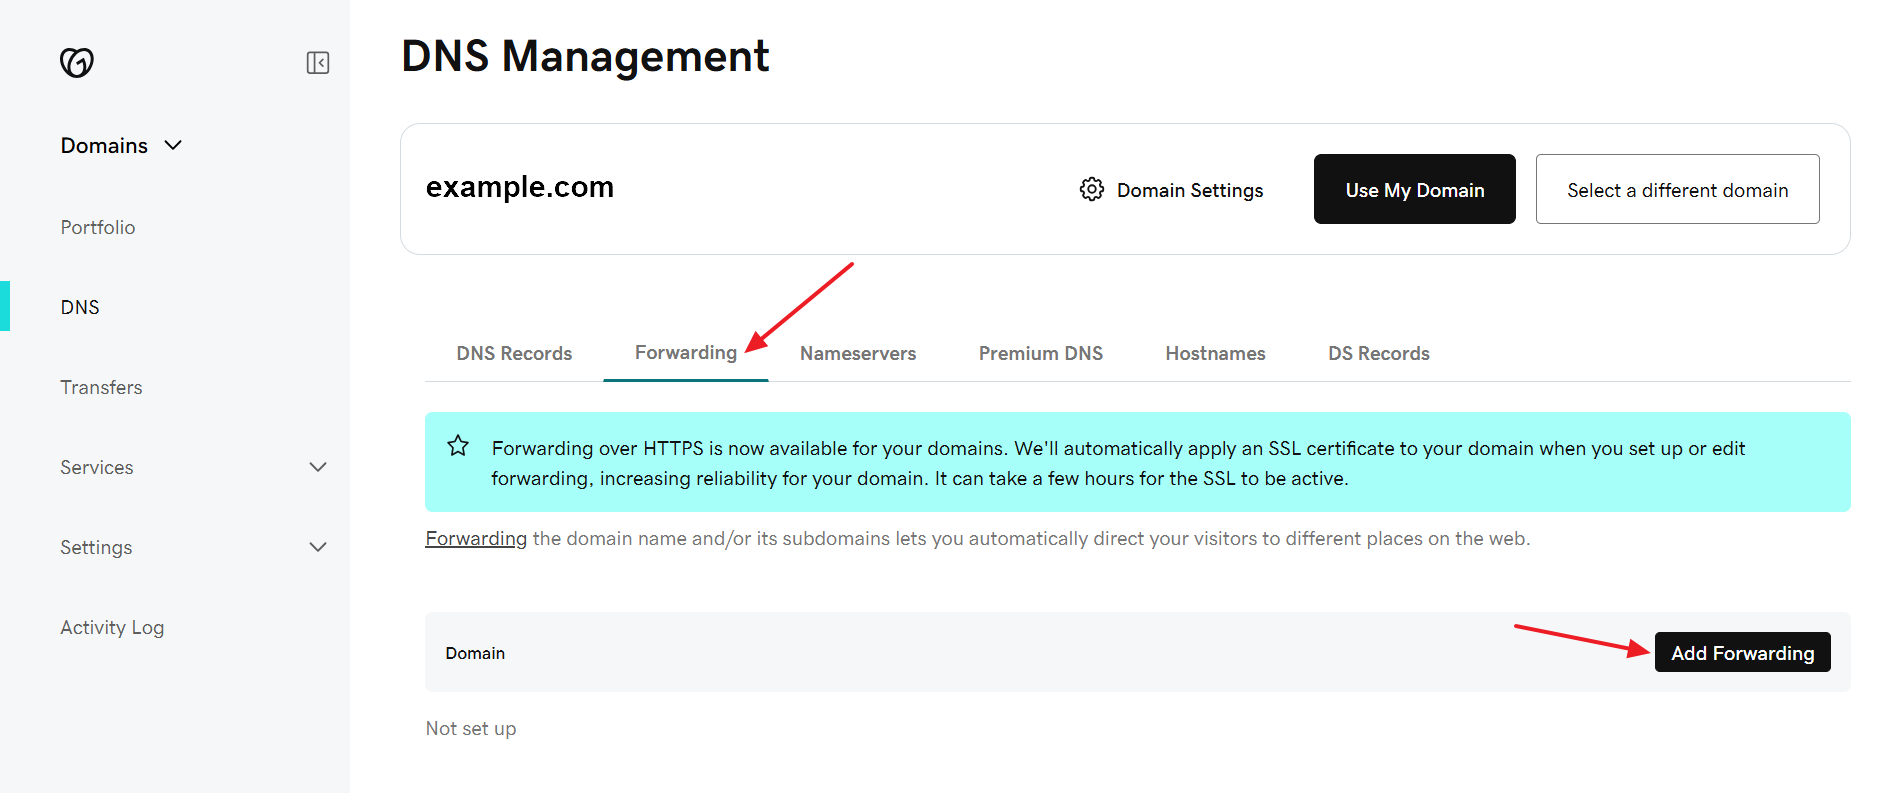
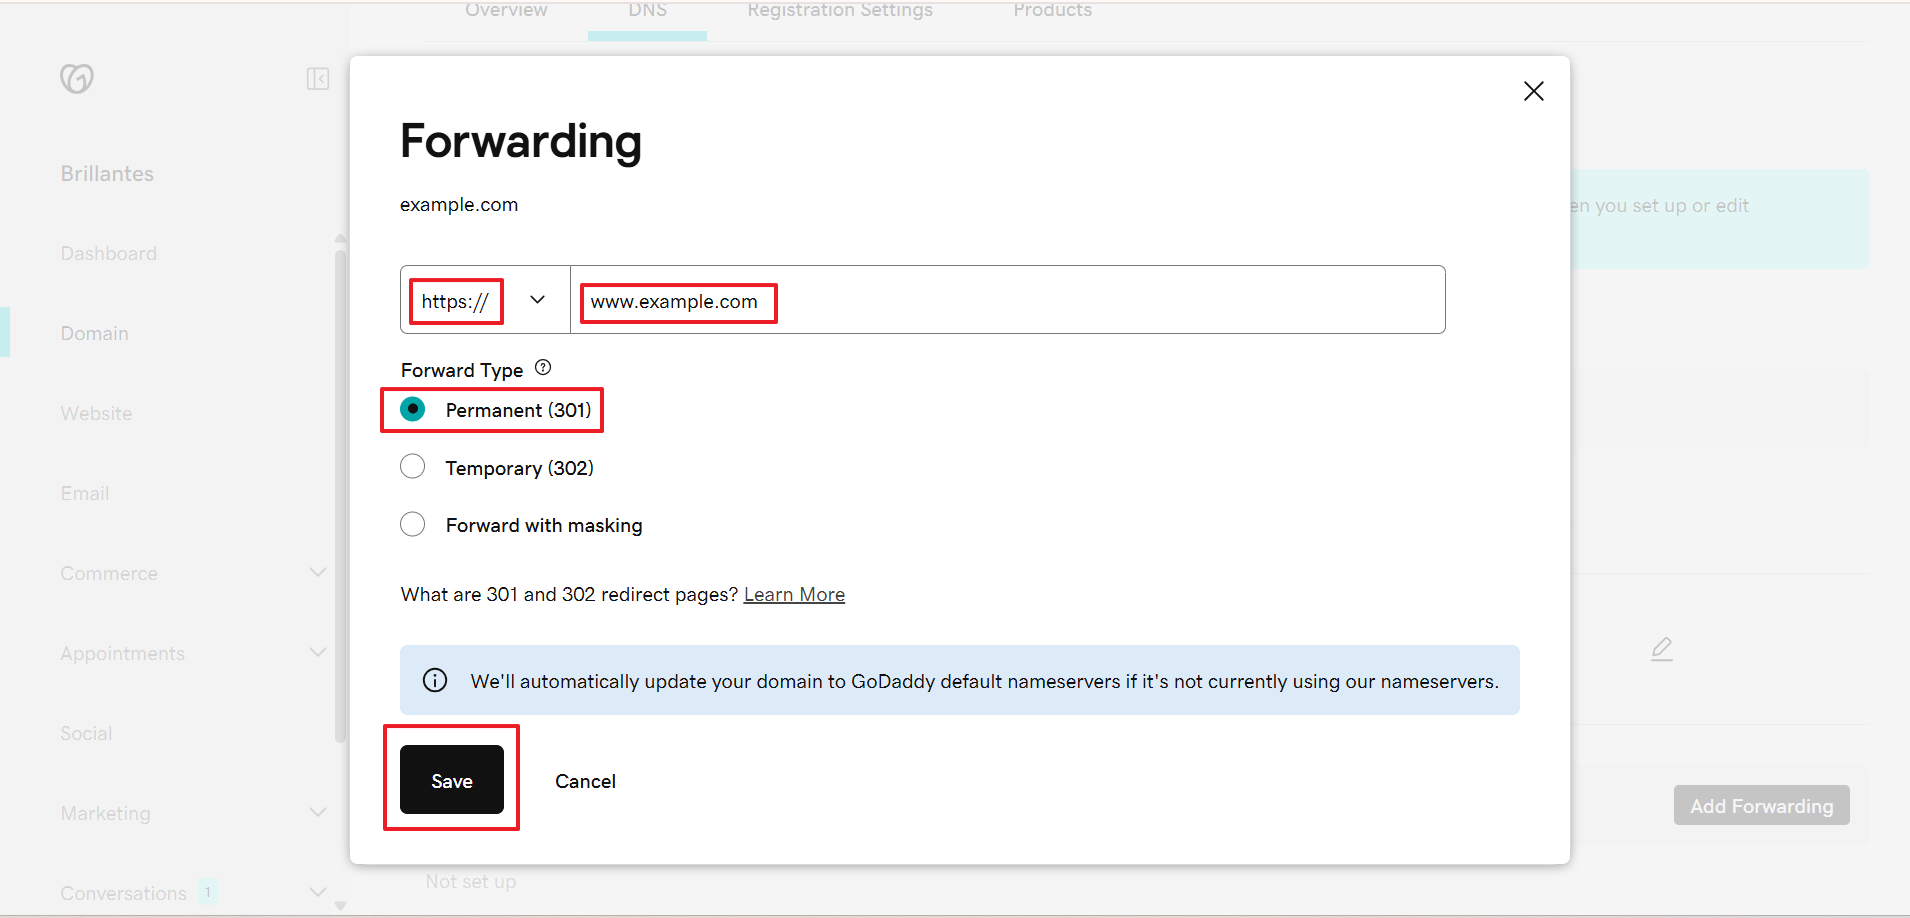
GoDaddy's Forwarding settings: forward the root domain to the https www address, permanently (301).
The Point Domain stage shows this forwarding in place of a root record, with a link to GoDaddy's guide. Once example.com forwards permanently (301) to https://www.example.com, the root domain reads Pointed on the Point Domain and Switch Over stages.
With Without www., do not turn on Domain Forwarding for the root domain: the website already sends www visitors to example.com, so a forward the other way sends visitors in a circle and the site stops loading. Add an A record for the root instead, alongside the www CNAME:
Type: A
Name: @ (the root domain, example.com)
Value: The server address shown for the root domain on the Point Domain stage
An A record points at a fixed address, so if the website moves to a different server in the future, that one record needs the same update.
Namecheap
Namecheap supports an ALIAS record on the root of a domain. Namecheap does not allow an ALIAS record alongside an existing A, AAAA, CNAME, or redirect record for the same host, so delete the current root domain record first, then use Add New Record to create:
Type: ALIAS
Name: @ (the root domain, example.com)
Value: The site's unique directoryup.com target
Type: CNAME
Name: www
Value: The site's unique directoryup.com target
Namecheap's guide: How to create an ALIAS record.
Other DNS providers
Add the www CNAME above, and an A record for the root domain:
Type: A
Name: @ (the root domain, example.com)
Value: The server address shown for the root domain on the Point Domain stage
An A record points at a fixed address, so if the website moves to a different server in the future, that one record needs the same update. For the long term, moving the domain's DNS to a free Cloudflare account avoids this, because Cloudflare can hold the site's target on the root domain; see Connecting a Site to Cloudflare.
Use a connected Cloudflare account
After Cloudflare authorization, filter the domain list and select the intended domain. Choose its main www. address or enter a subdomain, then click Use this address. The wizard prepares the DNS records and advances to Switch Over, skipping the Point Domain stage. To see the record it added, click Show me the DNS record you added on the Switch Over stage. Start over returns to the three choices.
A domain entered through A domain name I own can also be on Cloudflare. When the domain is in the Cloudflare zone already connected to the site, the Point Domain stage offers Add this record for me. When it is on Cloudflare under a different zone or account, the stage offers Set it up for me, or Sign in and set it up for me when the account holding that domain is not connected yet. Use the offered button, or expand I would rather add the record myself to add the record by hand, then click Check again. Preparing a record does not complete the website-address switch; the final confirmation is still required. See Cloudflare in Domain Manager.
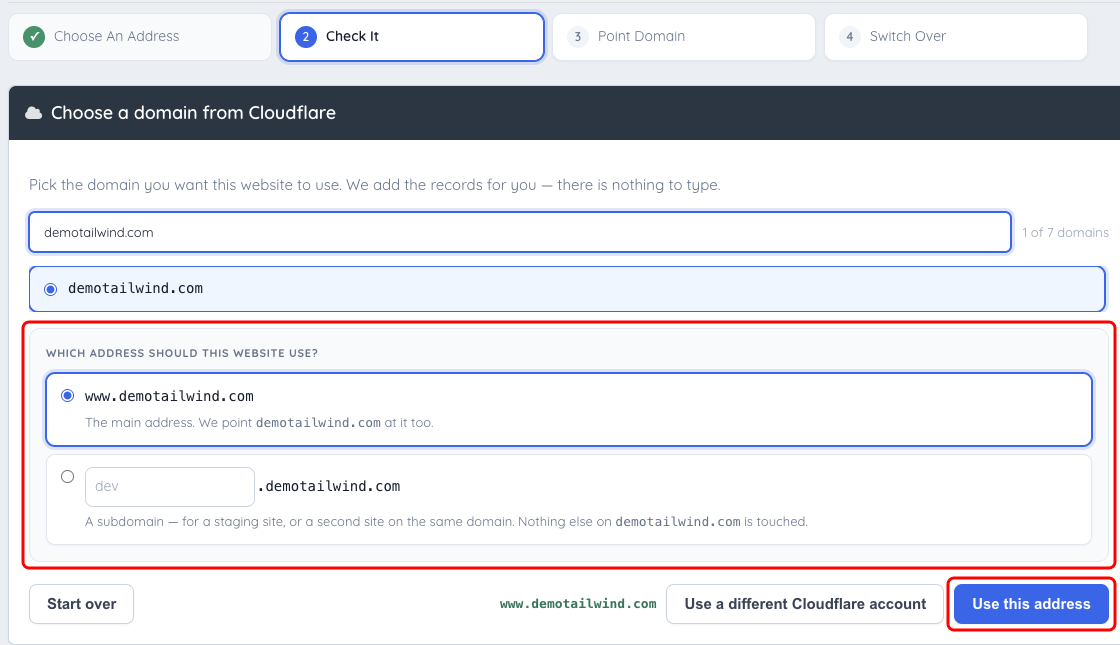
Filter the Cloudflare domain list, select the intended domain, and choose the main address or a subdomain.
Move the entire domain's DNS to Brilliant Directories
The nameserver alternative is appropriate when the whole domain's DNS should be managed by Brilliant Directories. It is not necessary merely to connect one subdomain. On the Point Domain stage, select Nameservers instead of DNS record to show the two nameservers, then replace the domain's nameservers at the registrar with both of them:
Nameserver: ns1.directorysecure.com
Nameserver: ns2.directorysecure.com
When the domain already uses these nameservers, the Point Domain stage reports We manage the DNS for the address. There is nothing to add; the record is created during the switch. A nameserver change can take a few hours to reach everyone.
The wizard warns that this moves all DNS to Brilliant Directories. Preserve and recreate the records required by existing email and other services before changing nameservers. For a single subdomain while the main website or email stays elsewhere, use the subdomain CNAME route.
Free directoryup.com addresses do not need records changed at an external registrar; their flow skips the Point Domain stage.
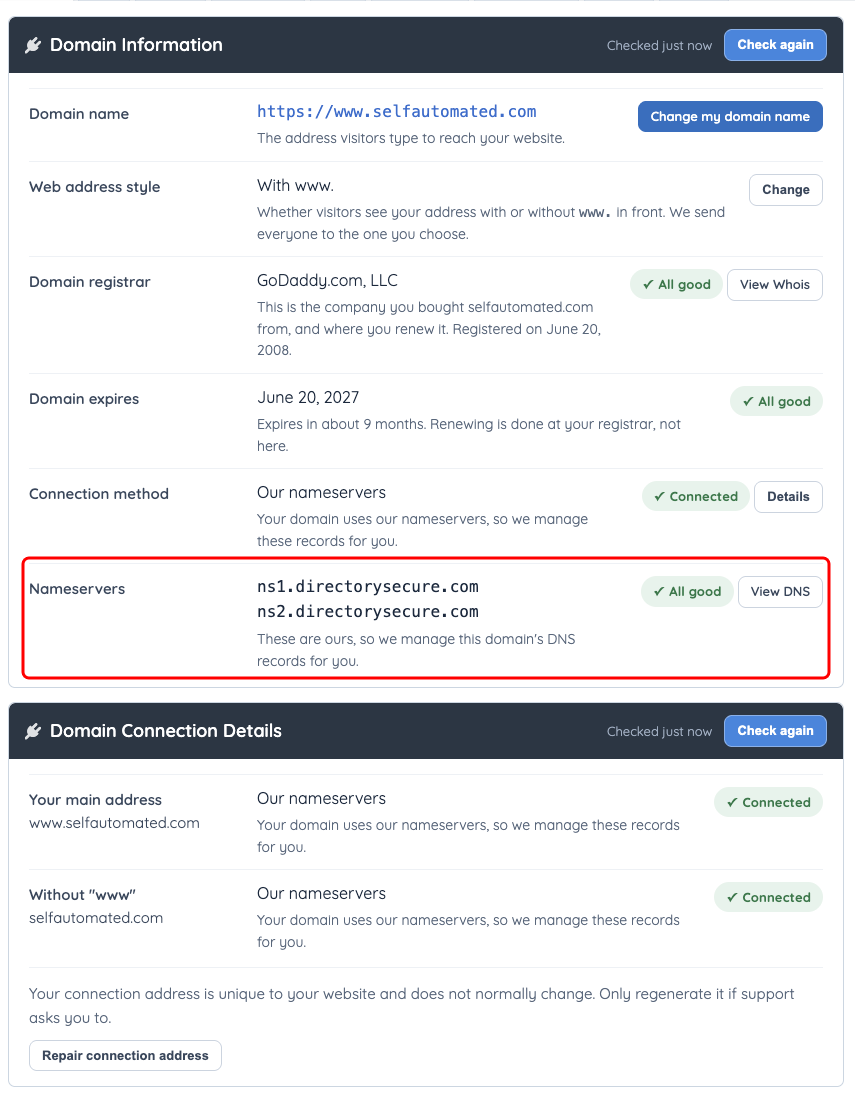
Non-Cloudflare example: selfautomated.com is registered at GoDaddy and uses Brilliant Directories nameservers. The Domain tab confirms that both the main address and the address without www are connected.
4. Switch Over
- Click Continue after reviewing the pointing result. When the main address is not pointed yet, this button reads Continue anyway.
- Check Now and After the change. After the change lists the main address first and, for a root domain, the other version with forwards to. Each shows its own status: Pointed, Cannot verify, Checking…, or Not pointed yet. Click Not pointed yet to see what is missing; Show me what to set up returns to Point Domain.
- Read the message above the buttons. Ready to switch to the new address appears when it is ready; otherwise What happens when you switch describes the change. Both name the current address, which stops loading the website once the switch is done.
- Click Switch to this address.
- Confirm Yes, switch it in the confirmation dialog.
- Keep the page open until the progress screen completes.
Do not treat a Not pointed yet result as a completed connection. Continue anyway allows the switch before DNS is ready: the new address does not load the website until its record is in place, and the current address stops working straight away.
If Without www. was chosen but the root domain does not reach the website yet, the switch keeps the website on the www version and Domain Manager says so. Change it later under Web address style once the root domain points at the website; see Set Up The WWW or Non-WWW Version Of The Domain.
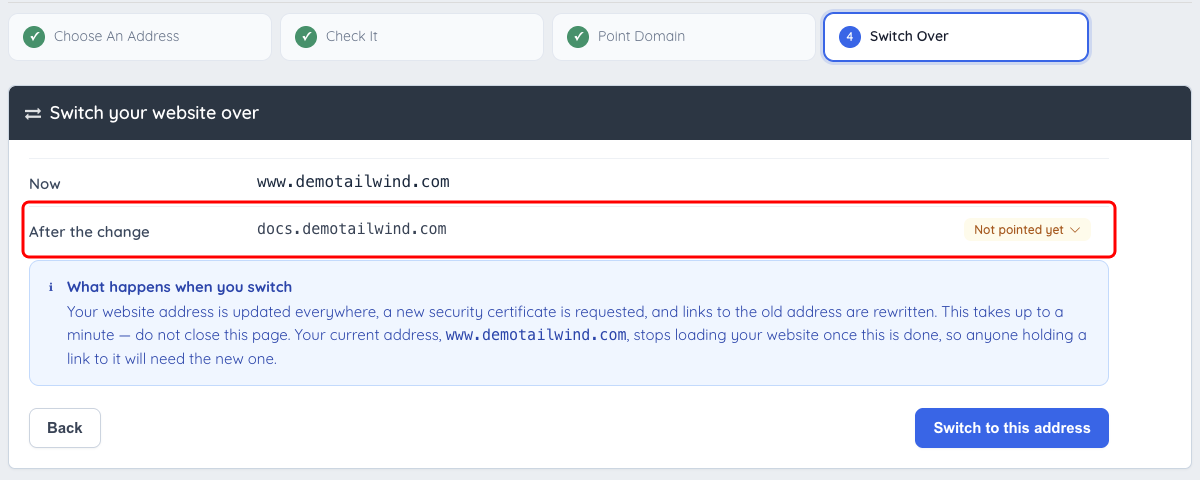
Review the current and new addresses and the message above the buttons before confirming the switch.
Confirm the result
The completion screen identifies the new address and the remaining setup tasks. Email authentication is attempted during the switch when the connected DNS service can accept the records. If manual setup is required, follow the Emails tab's instructions. Managed SSL installation is attempted when the add-on is active; certificate issuance can finish after the address change. The switch also moves the website's sending address to the new domain when it used the old domain or a placeholder address, keeping the part before the @. An address at another domain, such as a Gmail address, is left unchanged.
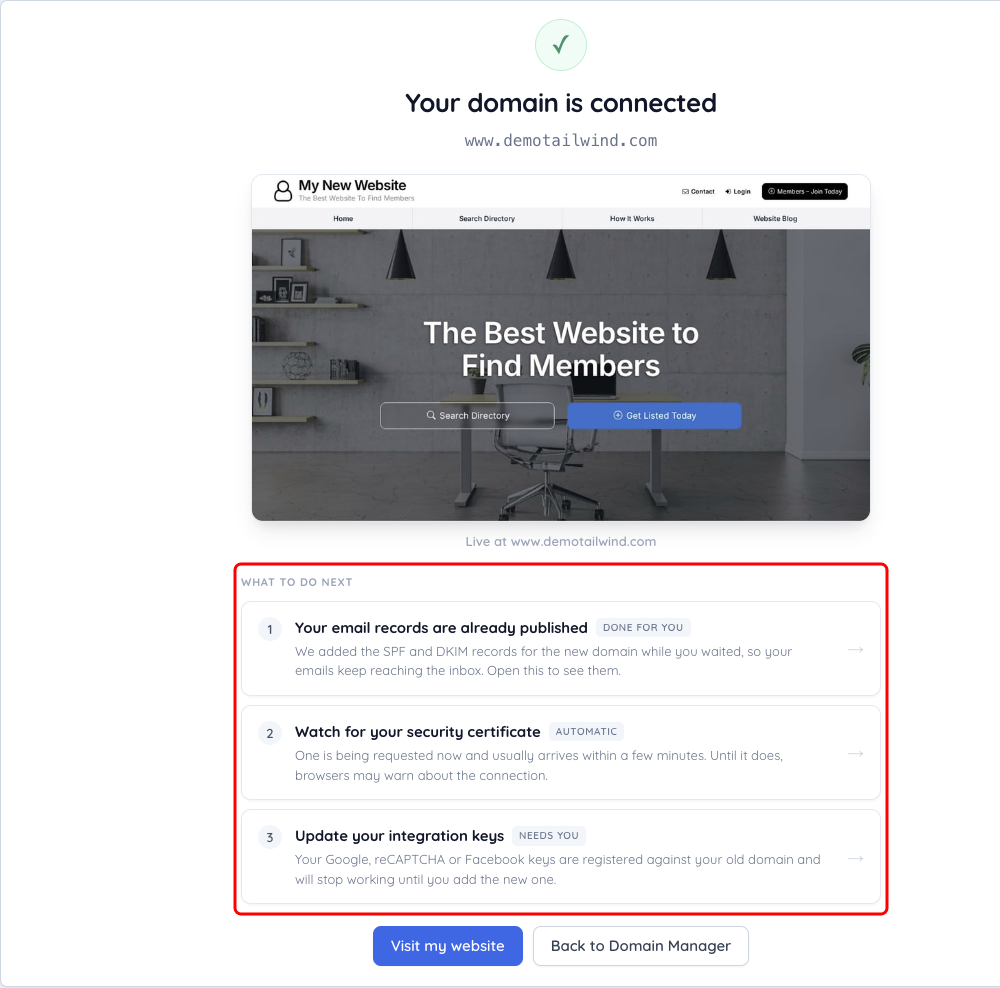
The completed switch identifies the new address and the remaining SSL and integration tasks. Website sender authentication is separate from incoming-mail setup.
- Open the new website address.
- Review the SSL tab.
- Review Emails > Sender Authentication.
- Test website forms, login, and any domain-restricted integrations.
DNS changes can take time to become visible everywhere. Use Check again and compare the exact host and target if the connection remains unresolved. Contact support with the domain, site ID, and displayed error when the records appear correct but the site still fails.
Free-address testing has separate limitations; see directoryup.com Subdomain Test Credentials.
